Apple Photos is the central location for storing images and videos you take on your iPhone. Here’s how to use it in iOS 26, iPadOS 26, and macOS 26.
A mainstay of the Apple ecosystem, Photos is the base of operations for your personal imagery. If you’ve taken a photograph with an iPhone or iPad camera, or recorded a special moment as a video, it’s probably stored in Photos.
Thanks to Apple’s well-connected ecosystem and iCloud, it’s a collection that can be synchronized across all of your devices, and even stored online for safety.
However, it’s not just an app to store your memories. It lets you categorize your images into albums, edit shots to make them perfect, and even create memorable slideshows of special events.
There’s quite a lot you can do with Photos, and what follows will guide you through the essential elements.
This guide is specifically for the version of Photos included as part of iOS 26, iPadOS 26, and macOS Tahoe 26.
Photos: Basic navigation and the Library
The main talking point about the 26 generation of Apple’s operating systems is the use of Liquid Glass. However, when it comes to Photos, the only version that has undergone real changes to its interface is the iOS app.
The macOS and iPadOS apps are very similar in terms of layout, and haven’t gone through as much of a change.
iOS 26
While the previous Photos app for iOS provided a single-page layout, Apple backed away from that idea for the new Liquid Glass version. Though Apple hasn’t completely reverted to a tab system, it has split Photos into two general sections: Library and Collections.
These can be switched between using the glass blob in the bottom left, when in either of the main views.
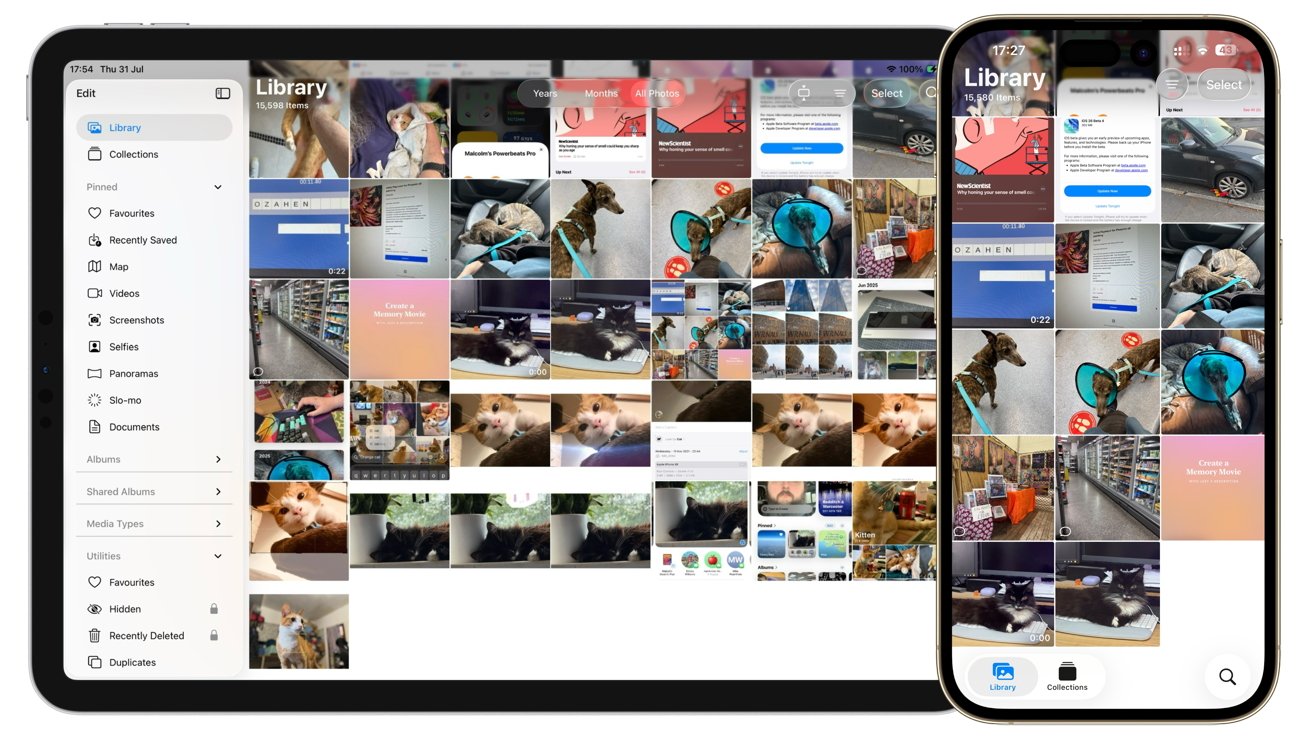
Photos in iPadOS 26 and iOS 26
Your initial port of call is the Library, which shows a grid of your photographs, starting with the newest at the bottom and older shots going higher up the grid. Swiping the grid down scrolls the page, showing older shots the further you go.
When you scroll, the Library and Collections panel shrinks to a small blue button in the bottom left, making way for a second glass lozenge. This gives you options to view the images grouped by year, month, or all in chronological order.
In the bottom right is a Search icon, which when tapped, will let you use words to search for images. These searches, using natural language thanks to Apple Intelligence, let you look up based on themes and image content, such as “Cat in garden” or images of a person taken in a specific year.
It’s intelligent enough to understand concepts such as “Orange cat,” “Chicken roasting in oven,” or even “Paris Apple Store.”
At the top of the Library is a filter button, which lets you change the sorting order to Date Captured or Recently Added, adjust the view options, and to filter shots. These filters include whether you have favorited an image, edited it, or the type of content you’re looking through.
A Select button will let you select multiple images, which you can then delete, share with others, add to albums, or perform a variety of other functions to as a group.
You can also increase and decrease the size of grid squares by a pinch-to-zoom gesture. This can help you quickly navigate the grid, or simply make it easier to see the content of an image in the thumbnail without fully opening the image up.
Of course, to look at an image in full resolution, just tap it to expand the cell. A long press will bring up additional options, including copying, sharing, favoriting, deleting, and adding the image to an album.
iPadOS 26 and macOS 26
The macOS and iPadOS versions of Photos are laid out in practically the same way, albeit with some platform-specific concessions. Both rely on the idea of using the sidebar to go between the different sections of the app, rather than dividing it into a Library and Collections view.
Instead, while the sidebar has Library and Collections at the top, you’re also presented with many other options for selecting albums and content based on type. You’re also shown various Utility functions on the list as well, which are really increased filtering options.
The grid view in Library functions in the same basic manner as iOS, but the layout is considerably different.
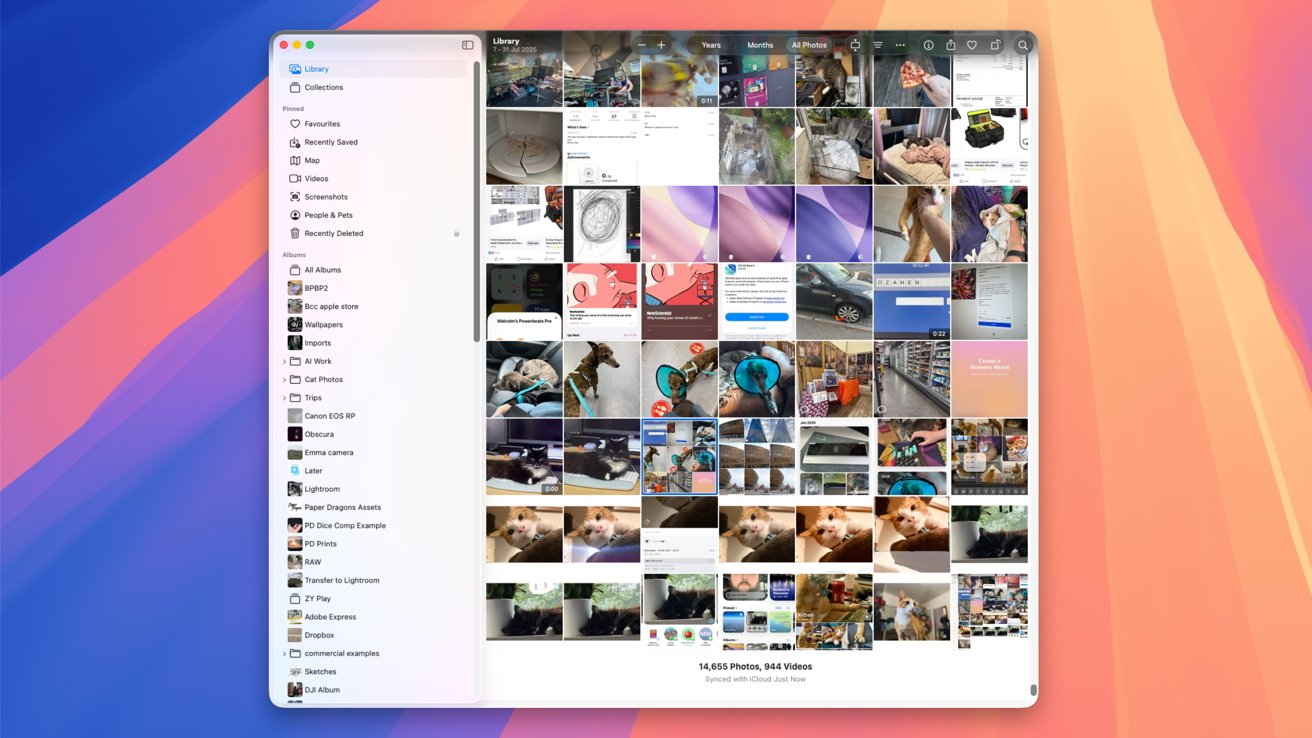
Photos in macOS Tahoe 26
In macOS 26, the top of the grid has buttons for zooming in and out, the Years, Months, and All Photos options, filtering, whether the thumbnails fill each square or are completely visible, information, sharing, favoriting, rotation, and search.
The iPadOS 26 top bar is not as extensive, with it including the Years, Months, and All Photos options, grid filling, filtering, item selection, and search icons.
Again, selecting a single image will expand the cell. A long press of an image in iPadOS brings up more options, as does right-clicking an image in macOS.
Photos: Image options
Bringing up an image in a full-screen view brings up the shot with a similar set of options across the board. Again, there are differences between operating systems.
For a start, iOS and iPadOS will show the shot with a row of thumbnails showing the current selected album, filtered collection, or camera roll. This lets you quickly switch between close-together shots in a group, though you can also swipe between them too.
iOS 26 and iPadOS 26
For iOS, there is a back button in the top left corner, while the top right has options to copy, duplicate, add to album, and adjust the metadata of the shot. On the bottom row are the share, favorite, information, edit, and delete icons.
The interface in iPadOS 26 is similar, but with the bottom row buttons transposed to the top of the screen instead. They do the same things, just in a different place.
Swiping up on the image brings up the metadata of the shot, including the date and time, captions, what device it was shot on, focal length, ISO, and location, among other details.

Searching for a single image, viewing it, and the metadata in Photos for iOS 26
That metadata option can also bring up details via Visual Look Up, which recognizes the contents of the image and can provide Siri Knowledge results, such as dog breeds.
Depending on the shot’s source, you may also see extra icons near the top of the screen. This can include a Portrait button that lets you convert it into a portrait shot, complete with computational bokeh.
There is also now a button for turning an image into a Spatial Scene, which will create a new 3D-like effect on an image. This is useful if you have an Apple Vision Pro, or you take advantage of the new Lock Screen customization in iOS 26.
As you scroll through shots, you may also see circles around faces. You can select to caption these with a name, so Photos creates an automatic collection of that person or animal whenever they appear in other images in the future.
Selecting the trashcan icon deletes the image, which can affect just the currently-used device or all of your devices, if you have iCloud Photos enabled. It will remain in Recently Deleted for 30 days, in case you want to rescue it.
macOS 26
In macOS, the single image view is made more for mouse usage. Aside from scrolling down to see limited metadata such as location details, as well as right-clicking, all the usable elements are at the top of the screen.
The top left has a back button and a zoom slider. Top right has Get Info, sharing, favoriting, rotation, Auto Enhance for quick edits, and an Edit button.
Photos: Editing
When you’re in the full-screen view of an image, you can enter the editing interface by tapping the sliders in iOS and iPadOS, or the Edit button in macOS.
The interface offers a wide selection of things you can change in the image. Naturally, you can select Auto to allow Photos to make its adjustments to what it thinks is an ideal image.

Editing in Photos for iOS 26 with Adjust, Filters, and Crop.
The editing options are split into multiple sections, titled Adjust, Filters, Crop, and Clean Up. While the interfaces are different in macOS versus the other two platforms, they all ultimately offer the same goal of tweaking an image to perfection.
In some cases, such as a Portrait shot, you may get the fifth section of the same name. This can be used to change the level of defocus of the background, if warranted.
Adjust
Adjust is the section used to make the main edits to an image. This pretty much consists of making changes to the general settings of a photograph, rather than cropping or changing individual areas of pixels.
In iOS and iPadOS, this includes:
- Exposure,
- Brilliance,
- Highlights,
- Shadows,
- Contrast,
- Brightness,
- Black point,
- Saturation,
- Vibrance,
- Warmth,
- Tint,
- Sharpness,
- Definition,
- Noise reduction,
- Vignette.
On iOS and iPadOS, these are adjusted by a single slider for each item.
On macOS, the Adjust menu doesn’t follow this list. The collection of controls includes Light, Color, Red-Eye, Curves, Levels, Definition, and others, all with multiple sub-sliders providing finer-grained control.
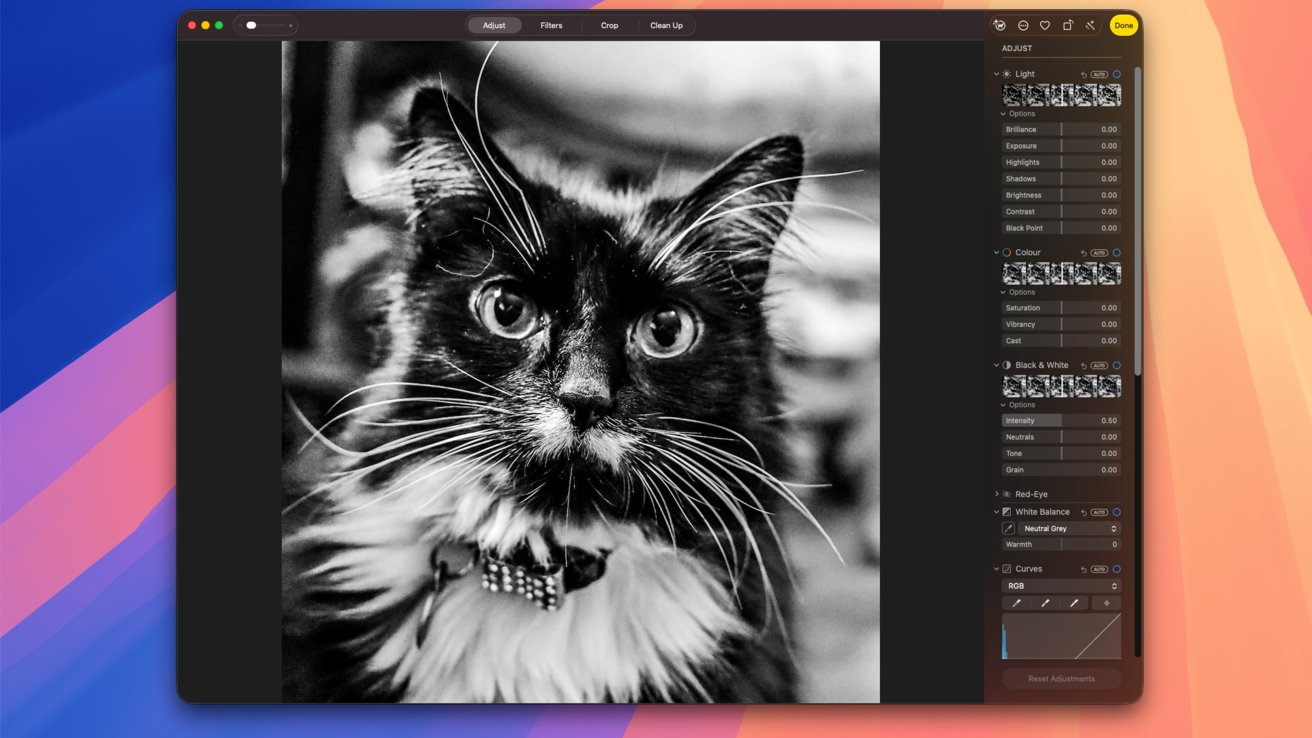
Editing in Photos for macOS 26
In some cases, such as Curves, there are adjustable lines and graphs, which are more suited to professional and avid photographers than the typical user. Ultimately, you can make the same sort of edits on iOS and iPadOS as you can on macOS, but it is handled very differently.
This does mean you should manage the image on macOS if you want even more control over how an image appears, far more than what iOS and iPadOS provide.
Filters
As the name implies, Filters are a set of predefined settings that can be applied to an image. These stylize the image in a few ways, such as Vivid Cool or Dramatic Warm, with contrast and brightness changes alongside color temperature.
Users can use the included slider to adjust the intensity of the filter versus the original image.
Crop
The Crop section has a bunch of controls that dictate how the image appears within the overall canvas. The most obvious is to actually crop the image, which shrinks down the final image to a selectable viewable area, using controls on the edge of the main image.
The section also allows you to change the aspect ratio of the image, such as making it thinner, which can considerably adjust how an image feels to the viewer.
There are also controls to change the vertical and horizontal skew, and to rotate it if necessary so subjects seem level and straight.
Clean Up
Added as part of Apple Intelligence, Clean Up can be used to perform selective edits to an image. This is more to fix the shot rather than to stylize it, such as by removing unwanted elements that may spoil a scene.
Think of it as being able to remove other tourists from holiday snaps, or wires from a shot of a skyline.
Clean Up can automatically identify elements within a scene that you may want to remove, highlighting them on your behalf. If you tap or click on them, Apple Intelligence will remove them and replace the void with pixels that should match up with the rest of the scene.
If Clean Up doesn’t detect the thing you want to remove, you can also draw with your finger, Apple Pencil, or mouse around the element you want removed. Apple Intelligence will detect the item and then try to remove it.
In each case, if the shot doesn’t look better or if Apple Intelligence doesn’t do a good-enough job, there’s a Reset button available.
Other editing options
If you don’t have much experience doing image editing there are many options available to simply let Photos deal with it. Auto editing can create a fairly decent result in most cases, with options in Adjust and Crop also available.
There’s also an icon of a black box next to a white box. Clicking this will switch the image from the current edited state and the original, so you can easily compare and review your alterations.
The Markup menu is also available if you want to draw over an image or add annotations. This can be handy for providing instructions to others or design feedback.
Do be aware that the edits are not permanent. So long as they were made within Photos, rather than being edited elsewhere and imported into Photos, you can quickly revert to the original image.
Video
The vast majority of the editing here is to do with images, but you can also do some video editing within Photos.
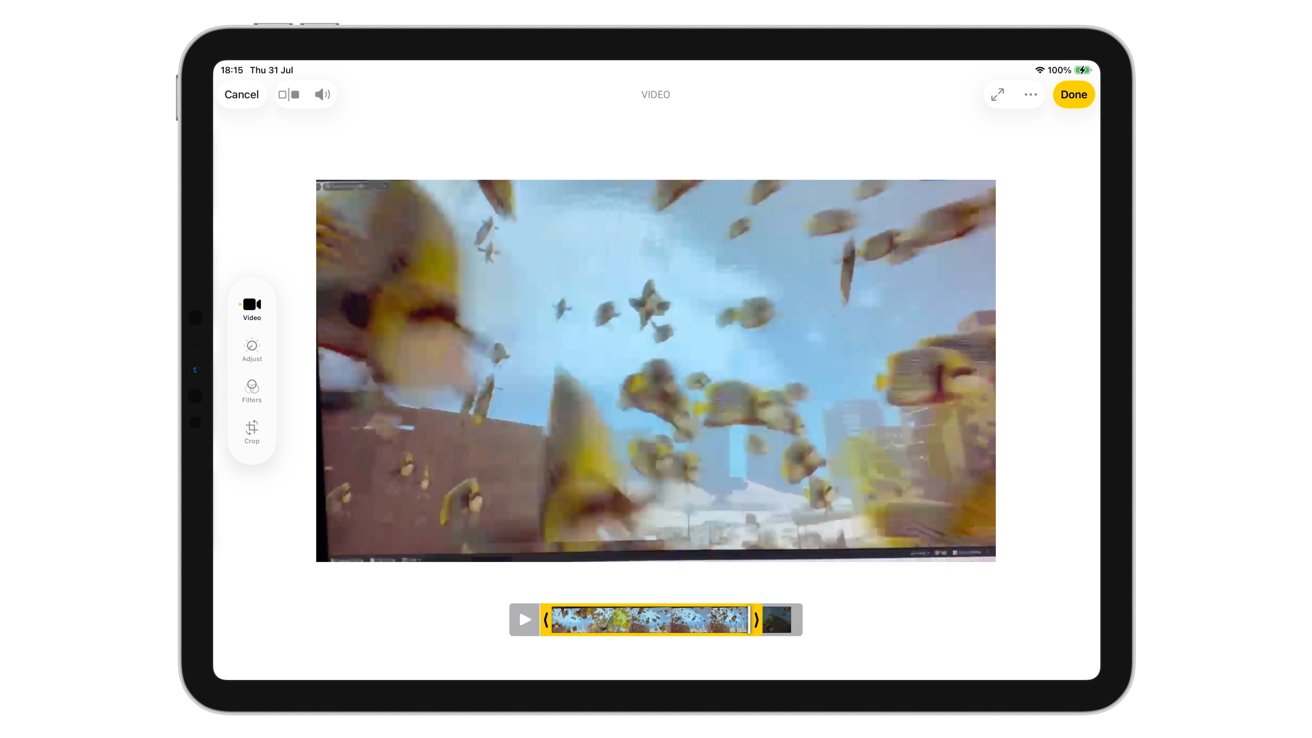
Editing a video in Photos for iPadOS 26
All versions can stylize a video using Adjust, Filters, and Crop tools as usual. However, on iOS and iPadOS, there’s a new Video section that can be used to shorten a video down.
In macOS, the trim bar is at the bottom of the Adjust screen.
For end users, this serves as a quick and easy way to cut down the length of a video, without resorting to using a full-blown video-editing app.
Photos: Collections
Visible under the Library/Collections switcher on iOS 26, or as a separate section under the sidebar in iPadOS 26 and macOS 26, Collections is a way to see your images, organized into groups. A lot of this is automated, based on the metadata of an image, for your convenience.
At the top are Memories, followed by a Pinned section that you can adjust to show your most-accessed sections. There are also rows for Albums, People & Pets, Featured Photos, Shared Albums, Recent Days, Trips, and Media Types. Right at the bottom are Utilities and Wallpaper Suggestions.
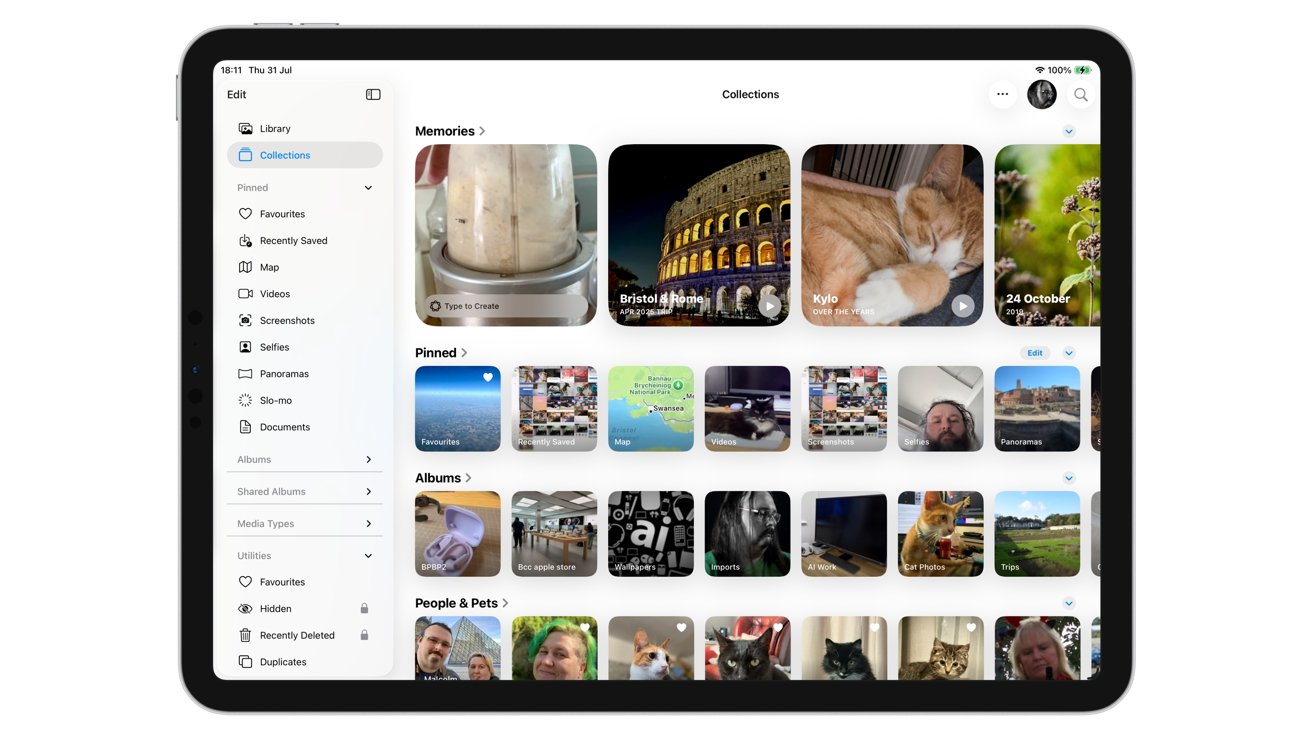
Collections in Photos for iPadOS 26
In iPadOS and macOS, a lot of these are accessible from the sidebar interface.
Tap the title of a section to bring up a list of all items within that collection, such as all of the albums automatically generated that collect together all images of your pets. An Edit option in the top right will give you controls to quickly remove or add items to the collection.
Albums
If you want to create a group of images, you’re going to want to do so as an album. This will allow images selected to be included in an album to be shown together as one group.
The easiest way to add an image to an album in iOS and iPadOS is to long-press or right-click an image, then select Add to Album. You can then select an existing album to add it to, or elect to create a brand new album from scratch.
In macOS, you right-click the image, then select Add To, followed by either the existing album or New Album.
You can add multiple images at once to an album rather than do them individually, by using the Select button on iOS and iPadOS, select multiple images, then long-press and select Add to Album. On macOS, hold Shift or Command and click multiple images, then right-click and follow the create album instructions above.
To remove content from an album in iOS 26 and iPadOS 26, you can long-press the image within the album, then select Remove from Album. Don’t select Delete here unless you want rid of the image completely.
You can also view the image in full screen from within the album, tap the trashcan, and select Remove from Album. Again, don’t select Delete unless you mean it.
On macOS, right-click the image in the album and select Remove from Album.
In all cases, you can select multiple images or items within an album for removal as a single action.
Memories
Memories are what Apple refers to as its automated and curated slideshows. A compilation of images and videos on a theme, complete with various transitions and zoom effects, so you can have a reminder of a point in time.
These will be automatically compiled over time, such as when you have a collection of images spread across a month. If you have a special event or go on a trip, it can analyze and create a memory based on that too.

Making Memories in Photos for iOS 26
However, you can also create highly-specific memories too, such as “Food from Summer 2024.” If you tap the first memory from the Memories section that has a search bar, you’re taken to a search screen to enter a sentence for Apple Intelligence to work from.
Across all operating systems, you can tap on a memory to see the images within it, and to change the various options for that presentation. If you don’t like the selected music, you can change that too.
Photos: Adding images and sharing shots
For the iPhone and iPad user, adding images to Photos can be as easy as using the Camera app and taking some shots. However, you can also ingest images from other sources.
If you connect a camera or card reader to your mobile device, you can attach a memory card from a standalone camera and import it from within Photos. Open Photos, which will bring up the Import tab, select the images you want to add, and then confirm whether you want to keep or delete the media on the memory card.
In macOS, you can use a connected camera or memory card reader, then from the Menu bar select File, then Import, and then select what you want to ingest. If you have image files already on your Mac, you can drag and drop them straight into Photos.
Sharing and Exports
Sharing an image or an album with others is doable in a few ways. The easiest way is to select one or more items, then tap the Share button and select the right option within the Share sheet.
You can also see a Share option by long-pressing an image on an iPad or iPhone, or right-clicking on a Mac.

Exporting original photos stored in Photos for macOS 26 Tahoe
Within iOS and iPadOS sharing, there is the option to Export Unmodified Originals, if you want to hand the original files over to someone else. This strips out any editing that may have been applied to the images and lets you save them without any of the changes.
In macOS, the option is also available. Select multiple images, then within the Menu bar, select Export, then Export Unmodified Originals.
Photos: Storage and iCloud
Like any other digital medium, all your precious photographs and videos take up space. Film too much or take too many shots, and you’ll find that your on-device storage will get very full, very quickly.
There are ways around this problem, and it can vary depending on your hardware.
The first option, if you have hard disk space available on a Mac but not on your iPhone, is to import your images to the Mac, or a Windows PC running the Apple Devices app. Connect your iPhone or iPad up, and use the tools to import your shots over.
iCloud
Another way is to take advantage of iCloud. So long as you pay Apple for online storage, you can upload all of your images to the Internet.
Apple has built-in mechanisms in its operating systems to synchronize files with iCloud, and that includes your photo library. Images and video can be uploaded to iCloud automatically, which can then be synchronized with other devices you own.
Aside from being able to access your images from all your devices, it’s also a way to save space. Originals can be stored in iCloud, while smaller optimized versions can be kept locally, though you can still access the full-scale versions whenever you need them.
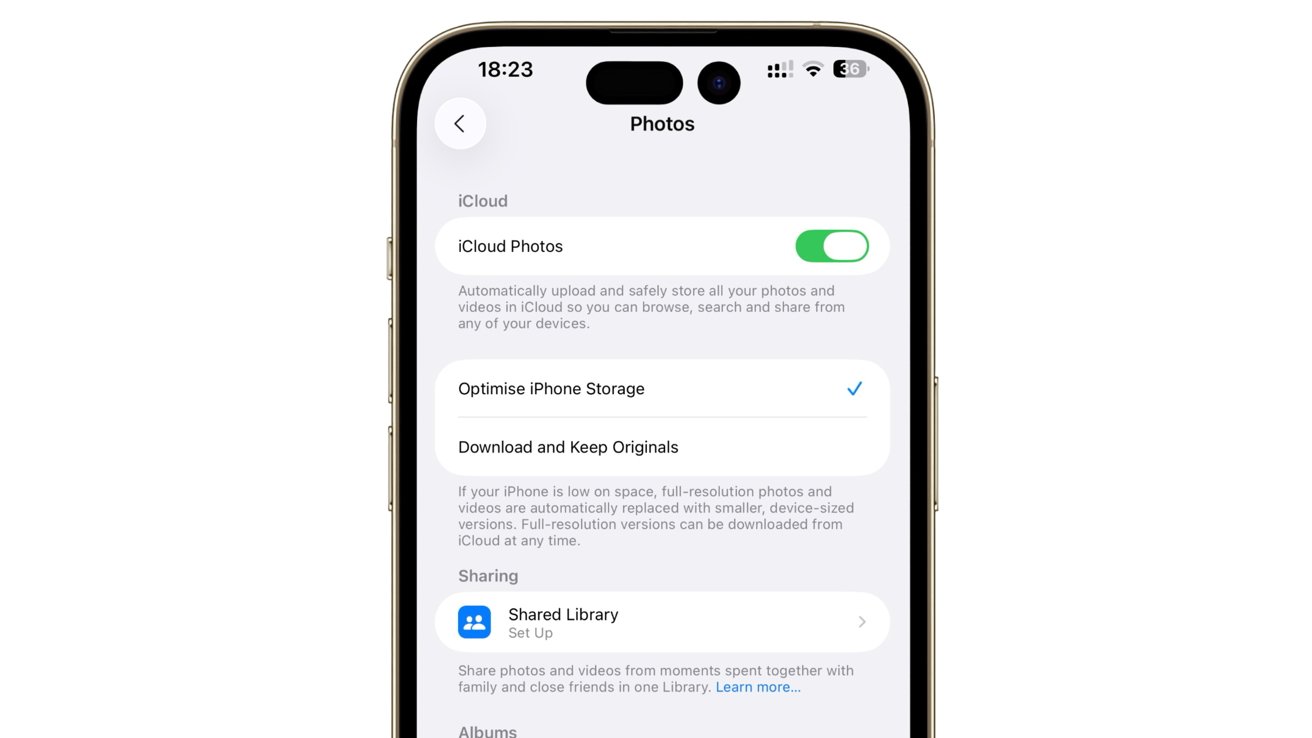
iCloud Photos settings in iOS 26
Bear in mind that this will almost certainly blow past the free 5-gigabyte allowance Apple provides all Apple Accounts, so you may need to invest in some more iCloud+ storage.
To get started, enable iCloud Photos in the Settings app on an iPhone or iPad, under Apps, Photos, then the iCloud Photos toggle. This is also the section that allows you to set up whether to optimize iPhone Storage to save space or if you only want to have originals on the device.
In macOS, go to the Menu Bar and select Photos then Settings. Under iCloud, enable iCloud Photos, and decide between downloading the originals and optimizing your storage.
This route also helps because you can view your iCloud library in a web browser by visiting iCloud.com.
Mac storage
While you can’t really change where your photographs are stored on an iPhone or Mac besides the built-in storage, you can at least do something about it for Mac.
It is possible to set Photos to store its library of images on a different drive completely. This means you can offload your storage to an external drive, while keeping the faster internal storage clear for other applications.
To do so, locate your Photos Library and move it. You can find the location by going to the Menu Bar, then Photos, then Settings, and looking for Library Location under General.
Once you have moved it to the new spot, double-click it to launch Photos, which also tells the app where the Library is now located.
While this guide covers a lot of what Photos can do, it doesn’t quite cover every possible thing you can do with the app.
For example, you can set up Shared Albums under the Settings app, so others can access your shared albums. There’s also the Hidden Album, which you can open up using Face ID and prevent anyone else from seeing sensitive images.
It’s certainly worth spending some time looking at what Photos can do for you, especially if images are a big part of your life.